Tag: blog

Word search- Step it up

hello viewers,

Today I had to make a cross word puzzle type of thing for the SLJ.[summer learning journey] At the start of this I had no idea what a cross  until I saw the task\post. Well you learn something new everyday!!!!

If you wanted to try my cross word then here is the link:

thanks for viewing my post

-Eva

AI’s🤖 art vs my😎 art

hello bloggers,

yesterday and today the whole school started to make a pice of art. Mr Albert siad to search up imagine.art.then we had to make an account. then there was a box that we had to type in some words and then once we did that, we chaynged the style of the pictrure. then we click on genorate, we had to wiat for a wile. and then there you go! you have a photo.oh and the max is 36.[ i not sure, but yah] I think AI is making pepole lazy, how


here is AI’S art

and here is mine

thank you.

hope you like it! bye!


cyiver smart Drawing tutorial^_^

namaste and hello bloggers,

on the 7th of november, for cyiver smart, we wached some totorials and mr Albert🧑‍🏫 said that we needed to make our own totorial in pears or indapintent.[wich means by our selves😃!]me [Eva the great] Anoosha and vanessah were indepindent.we all decided to make a flower in a garden🏡


if you wanted to see my video, then Ebublogs did not let me.🙄 so i will just talk it on MY blog.

what you will need:

paper📜

a Black or grey pincill✏

some colered pencilles🖍

and a ruler📏

now lets get started:

step 1: Draw a straight line[on paper], starting from the top then to the end of the paper, to make the STEM.

step 2: then draw a circle on top of the STEM to make the corona.[ the circle in side of the flower]

step 3: draw some petails on the outside of the corona.

then you have you flower oh and you can allso coller-in the pictre as well🖍

it will tern out somethig  like this:

promis me, your drawig DOES NOT  need to de perfict!
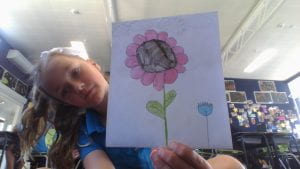


-By Eva

from hay park school in Mt Roskill NZ

BYE- EVA👑

how to make a paper lantern for Chinese language week🇨🇳!

Ni hau bloggers,

this week is Chinese language week! me [ Eva the great!] and Anooshah  wanted to teach you how to mack a paper lantern! and here are the steps:

what do i need:

paper, sisros, and decorations! now lets start this thing!

  1. Get paper and scissors to use (coloured paper is better then normal paper)
  2. Cut the bottom edge of the paper (at the dotted line). This will be the future handle.
  3. Fold the paper in half “hamburger style” (at the solid line).
  4. Fold the paper in half along solid line
  5. Cut along dotted lines through both sides of the paper. Make sure to stop before you get to the end of the paper to keep the strips all connected.
  6. Starting from the folded crease, cut along the dotted lines.
  7. Unfold the paper and loop both edges together. Seal edges on both ends with clear tape (or a stapler).
  8. Seal both ends with tape.
  9. Tape or staple on your handle.
  10. Optional: Decorate and hang as desired!


hope u enjoyed making a paper lantern whith us

HEY! are u doing something like this for Chinese language week! see ya latter!😁